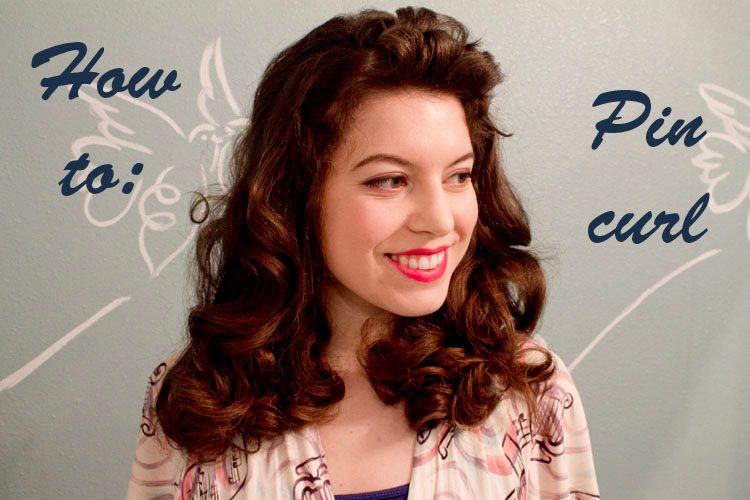
Warning, this is a long post. I wanted to answer any questions I've been asked in the past and any you might have.
My hair is natural (no dye or chemical process's), thick, and naturally wavy. It holds curl well, takes ages to dry, and gets frizzy in humidity. This is my hair. You'll have to make adjustments for your hair
You'll need a brush, comb, bobby pins, net for hair, and product such as setting lotion, hairspray, and pomade are optional.
If you have short hair (around shoulder length or shorter), your hair probably dries fairly fast. Right after you shower, you'll want to pat dry your hair with a towel (don't wring it, or rub it), brush it, and begin the set. If your hair does not hold curl well, apply a setting lotion.
If you have long hair (past shoulders or longer), you'll want to towel dry as directed above, but let it air dry a bit first. Your hair should be damp, rather than wet. If you pincurl your long hair when it's wet, it probably won't dry by morning, and a pincurl set is pretty pointless if you take it out still damp. I also find my hair is very frizzy if I set it too wet, not sure the science of that, but something you might want to take note of. Like me, you might have to set the front, let the back dry a little longer, and set that. You'll have a mullet in between. But just think of the awesome hair that will come of it.
Use your comb, or fingers, to separate a lock of hair. How big? It's up to you. You can see my standard, but how much hair you use for each pin, and how tight you curl it are big factors on the outcome of the style. Do remember that too little, and you may not find room on your head for all the curls, too much, and the pins will slip off and your hair won't set, or you'll get creases from the pins in the curl.
{How to roll a pin curl}
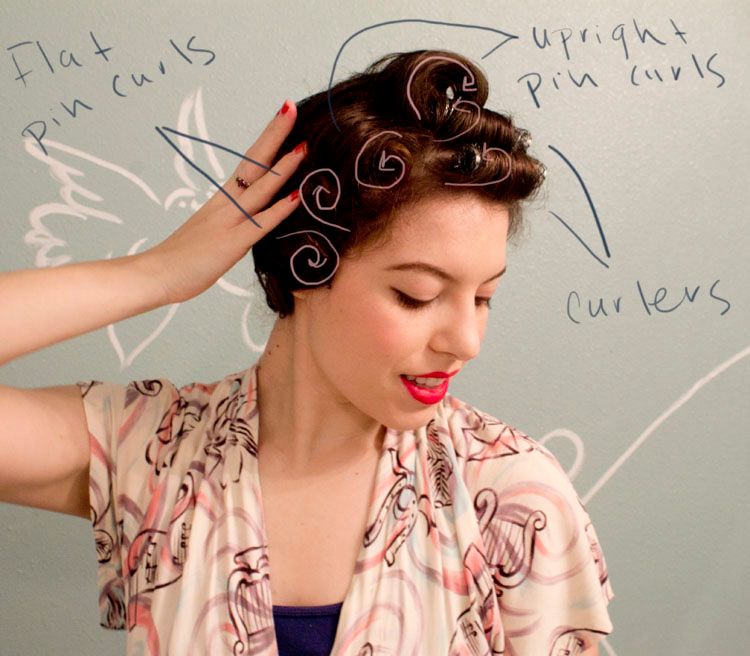
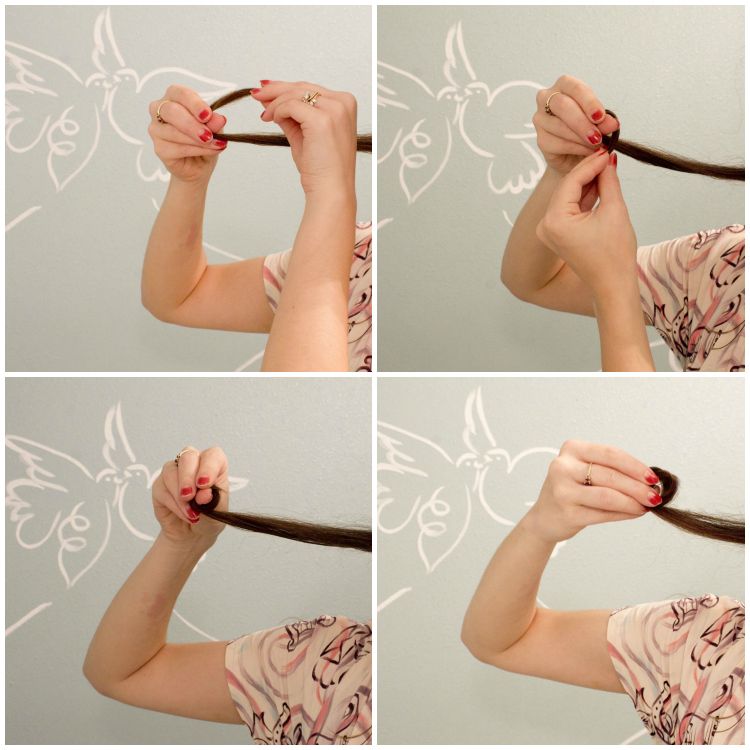
Take the lock of hair, and a few inches in, pinch it between your thumb and fingers, as shown below. With your other hand, take the end and wrap it loosely around your thumb, making a loop. Then pinch the end between your thumb and fingers. See? Easy. Now you slip the curl off your fingers and roll it toward your head, pinning a criss cross over the curl, and picking up some hair underneath for anchor it.
Now for the standard. These curls will be in rows, generally I have three rows, not counting the upright pincurls and rollers for my bangs. And a mess in the back, but we're not there yet. The first, and top row (again, not counting the upright curls) goes in the direction away from your face. So take a lock, and comb it back. Make a loop pointing upward or downward. The direction it's pointing will determine the outcome of the style of your hair, and today I'm showing curls pointing upward. This time, rather than have the curl stand up, it'll lay flat against your head. Take two bobby pins and criss-cross them over the entire curl and pick up some hair underneath as an anchor.
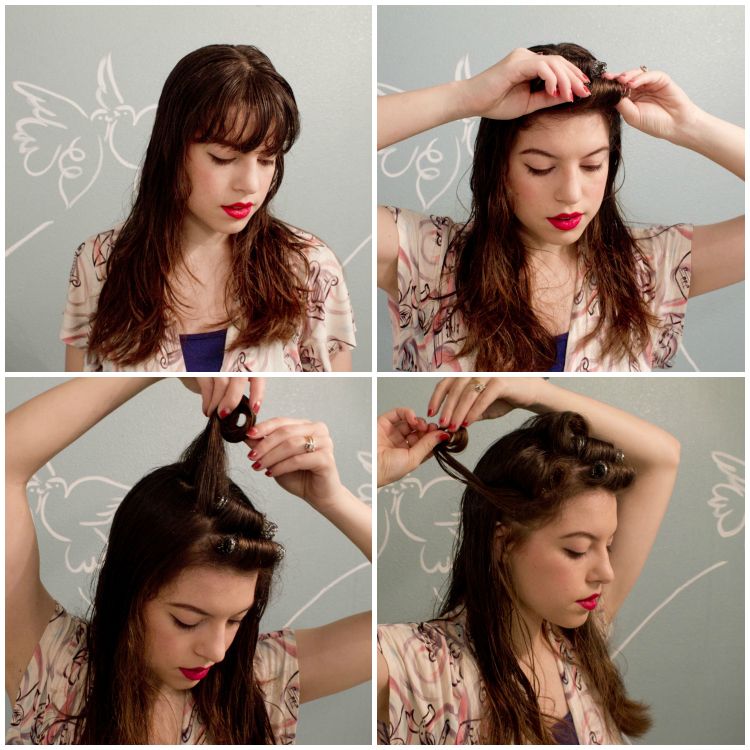
Repeat the top row another time, see the pattern? Back and fourth.
I would love to tell you the back follows a specific pattern, but I generally just try my best with the front rows and the rest has its own little party.
Now you'll probably need a bit extra for holding it together. If you sleep in the set, you want to prevent them from getting frizzy and un-pinned by having a mesh scarf around it. I used to use a thick hairnet, and it worked fine until I had to take it off in the morning and it would stick on the pins. I put a headcarf over that for being around the house, and just take it off when I go to bed and when I get up. Just for looks sake.
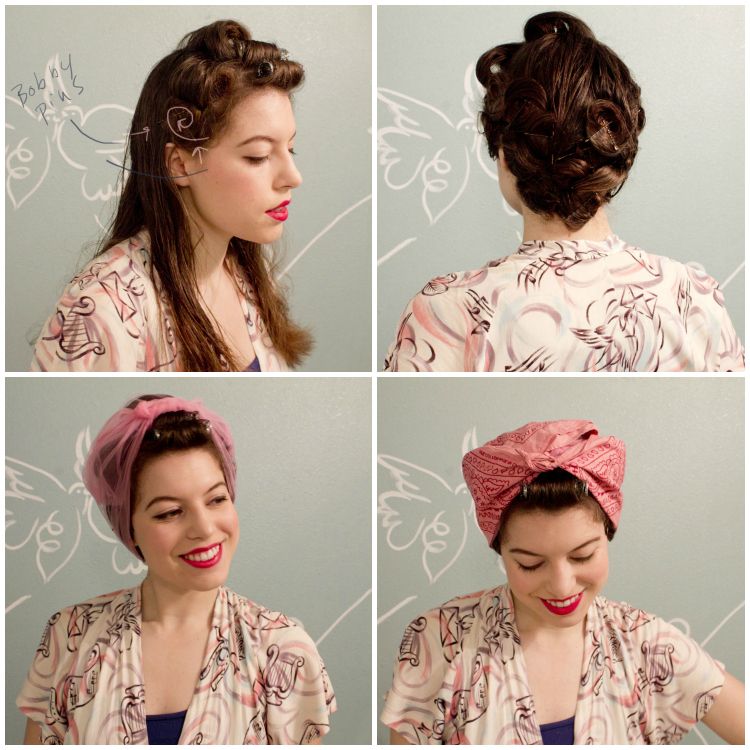
Now you have some sort of ringlet creation, and this is when we start brushing out. Brushing out is where I hear a lot of concern. You really have to tailor this to your specific hair type. Some people with finer hair simply separate and fluff the curls with fingers, I use a brush without much caution, but my hair holds the curl well.
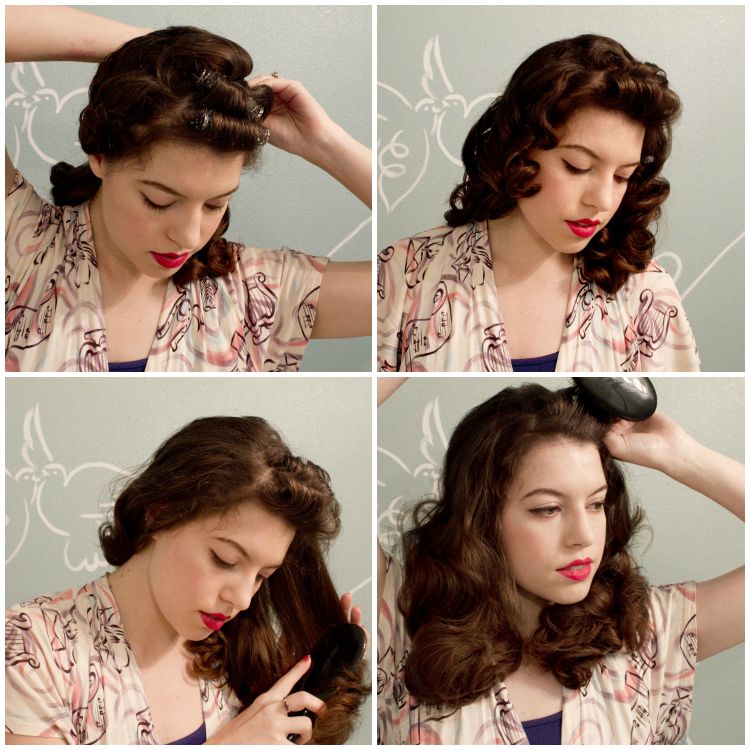
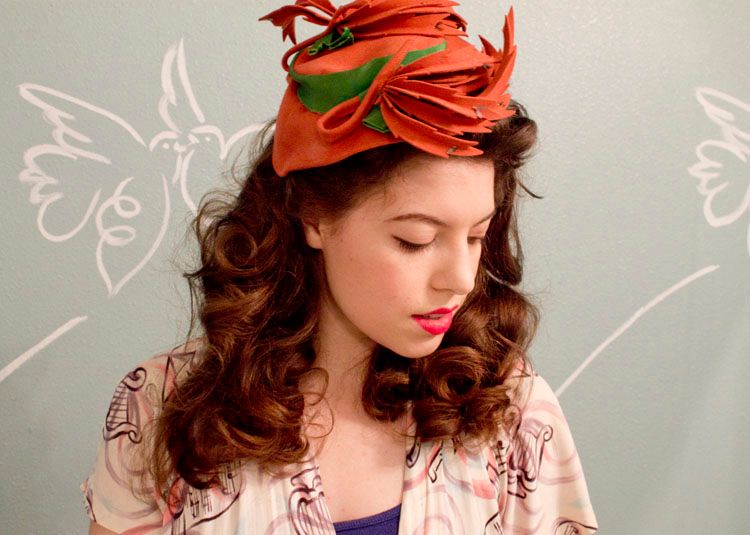
Now that you've done the set, you can leave it, or pin it and style it any number of ways.

44 comments:
What a fun post. Very instructive. I've been curious about pin-curls for years. You have fabulous hair.
I so wish my hair would hold a curl! Wonderful tutorial.
Thanks doll,
The Glamorous Housewife
So cute! You've inspired me to perhaps do a little post on how I do my hair. :)
I absolutely LOVE this tutorial! Your pictures are to die for! I need to get my hand on some hair rollers JUST to do this style. I LOVE it!
~Ama
I'm so very much looking forward to the rest of this series. I've seen your tutorial for pin curls before, and getting a refresh is really helpful. I always find brushing them out ruins it, so I use fingers generally. Looking forward to the next instalment in the series.
http://meggymoo0.blogspot.com
So helpful! I'll have to give them a try soon. Is there any trick to making them easier to sleep on? I've managed to master rag curls, but pin curls seem so... spiky.
Man, I wish I could do neat-o vintage hairstyles with my dreadlocks.
If you find an old round lipstick lid you like the size of, you ca nget very consistent curls by rolling the strands around it, pinning the open end, sliding it out and pinning the other end. My mom used to do pin curls for me and now I do them for myself and my daughter (although sometimes I'm lazy with hers and just do rag curls).
So cute! I wish my hair held curl better and I don't really like using product.
What a great tutorial! Thanks for sharing Solanah! I'm so excited for your future vintage tutorial series, looking forward to the next one!
Great Tutorial!
Jade
This tutorial was one of the best I've read for pin curls! You make it seem very do-able and I'll definitely attempt this soon. Having pretty, curled hair just makes a day seem so much better so maybe this will be a better way to curl my hair more often.
Forever jealous of your hair, it holds style so well. And you make it look so easy!
Great tutorial - with lovely pics.
Think I'll give this a go over Christmas when I don't have to run out of the door at 7am in order to get to work!
www.mancunianvintage.com
Great tutorial, thank you! :D
Gorgeous hair, I love it!
Wow, I loved the tutorial, I'm definetely going to try it!
xoxo
Marcela
www.glamour-vintage.blogspot.com
Yay, going to try this!
Another lovely hair tutorial to fight through those hum drum days where little inspiration exists. Thanks for this!
Thanks! This is a great post, and really easy to follow. x
Gorgeous! You make it look so easy. I think I'd need to find myself some setting lotion before I attempted this. My hair does not hold curls well at all :(
Thank you for the tutorial! I can't wait to give this a try, I've always been a fan of your curly hair.
I LOVE this! My hair is waay too long to really do this but I'll have to try anyway :)
-Sara, Road to the Heart
Beautiful curls and that's the most amazing hat!!!
Your hair are gorgeous. I would never make such a hairstyle on mine! Well, so I'll just admire you :)
Fun series, looking forward to more!
This is super helpful!
I was just watching an old movie with Barbara Stanwyck in it. the hairstyles were so polished back then, now I run across your tutorial to tell all about how to do it. Fun coincidence! Thank you!
What a thoroughly fantastic, detailed, excellent post. Bar none one of the finest I've ever encountered on the subject of pin curls. You're so (soooo!) lucky to be blessed with the kind of hair you have. I'd practically give my right arm for hair of that nature.
Thank you for the time and effort that went into this tutorial, it was really awesome of you to do.
♥ Jessica
Fantastic hat!
Great tutorial! Now I can truly see why my hair has been giving me issues when I curl my hair.
My hair texture has changed as I've gotten older do to heredity. My hair is no longer thick. It is now thinner, wavy,and baby fine which does not hold curl well any more. I am still trying to figure out what my hair likes. One thing I forgot when one curls their, it is very important to never curl the hair in the same direction, now I know better. Worked a ton of a lot better when pin curling my hair this time.
I also have bangs and layers, I was using flat pin curls to curl my bangs, the results came out fine. I like your tip better on how to curl bangs. I don't have brush rollers so in my case I adjusted just as you stated for my hair type. I used motions setting lotion or I'll spray my hair with water, using medium sized foam roller in place of the brush rollers for my bangs and to ward of denting I took one of my long thin metal pin clips and clipped it in the middle of the sponge roller to hold the curl in place, worked like a charm no dents to report.
I also like that you stated often that you do not curl your hair every day. Skipping a day to curl my hair has worked for me too. For me on my no curl days, I wrap my hair in a small messy bun wrap a ponytail holder around my messy bun to hold in place. For my bangs I part my hair on the side and use pin clips to lay my bangs flat. This is all done on dry hair. I wash my hair every three to five days.
Love, love, love this tutorial.
Great tutorial, very pretty! You make it look so easy!
http://eviestearoom.blogspot.com/
Ivy
Giving this a try on my waist length, medium body. I usually use foam curlers, but now that my hair is so long the foam curlers make it very curly at the end and barely wavy at least halfway up. I think you were the one who recommend Lottabody setting lotion in another post and I find it works great on my hair which doesn't hold curl very well, with the Lottabody I've had people think my hair is naturally curly.
You inspire hat lust my dear! Love it!
Lovely tutorial...pin curls are quite hard to master. I've done a few sets and it really takes practice, both in rolling and brushing out! It's helpful to see a pro at work.
Excellent post! I take "spray gel" and pour a bit into a spray bottle and dilute with water and spray that onto dry hair before rolling. I want curl on the ends and height at the roots so I focus on those areas.
I also curl before heading to the gym. A little moist heat from a workout reinforces a set. Obviously if your head sweats copiously that won't work for you, but I have shorter hair and it's never that damp.
It's a curlier look than a blow-dry, plus you don't have to spend half an hour holding your blow dryer with one hand and your brush with the other!
" NEVER use them on anything longer than a few inches, or they'll get tangled and you'll cry."
Oh, how I wish I had read this as a teenager!
My very, very fine and frizzy hair barely holds a curl, but I get some nice waves from doing this! Thanks.
Beautiful, beautiful hair. I'm (anxiously) waiting for mine to grow out ;) Thank you for the tutorial!
I just came across your blog, and after browsing several pages, i fell in love with your hair and was hoping for a tutorial! This post makes me so happy! :) Can't wait to try it!
That's really, really gorgeous! Thanks for the tutorial. I love classic look so I'm definitely going to do this soon.
-Cadence Vaughan
what is the headscarf you're wearing in the picture? its v cute :)
So, if you're doing this for Halloween, would you sleep in it all day, and then wear it for a while until you're actually ready to do the hairstyle?
I'm so very much looking forward to the rest of this series. I've seen your tutorial for pin curls before, and getting a refresh is really helpful. I always find brushing them out ruins it, so I use fingers generally. Looking forward to the next instalment in the series.
Katie
Post a Comment