If you know how to do pin-curls already, then this will be a cinch, it just takes it a step further by doing upright pincurls, and pinning the finished curls in a 40s style. I've been pin purling my hair for about a year, and it takes me 5 to 10 minutes to pin everything at night, and about 1 minute in the morning to brush it out and style it. So for anyone saying they don't have an hour to style their hair in the morning: Seriously, one minute.
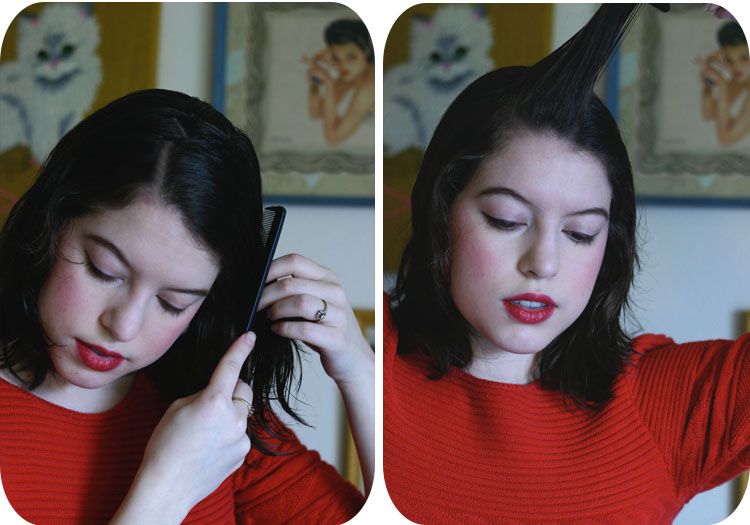
Make sure your hair is thoroughly wet, from root to end. I take showers at night, so that's not an issue. Otherwise stick your head under a sink!
I have thick hair that holds curl very well, so I don't use any sort of setting lotion. But if you have fine hair, or you just need extra help holding the curl, I've heard great things about Lottabody setting lotion. So, if you need a setting lotion, now is the time to apply it, and brush your hair smooth.
Part your hair at the side, then section off a portion of locks between your side part, and a middle part...
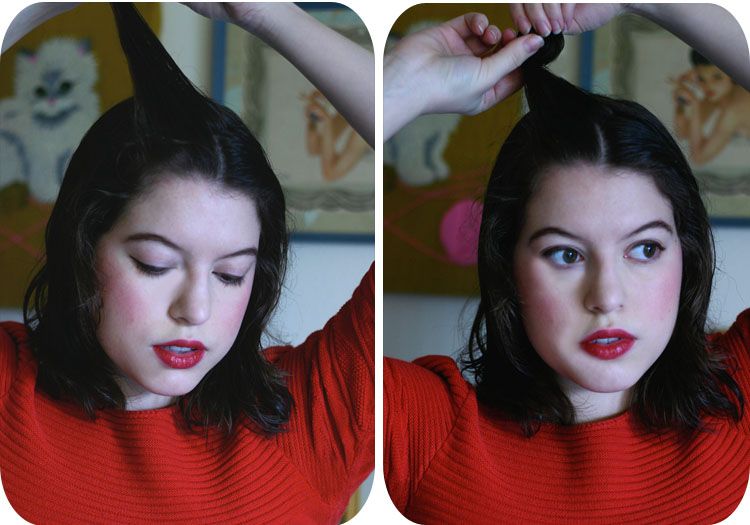
...brush the section in the opposite direction, at a diagonal. Now, instead of rolling the curl flat on your head, roll the curl upright, and pin at the base of your hair, right where the little arrow is.
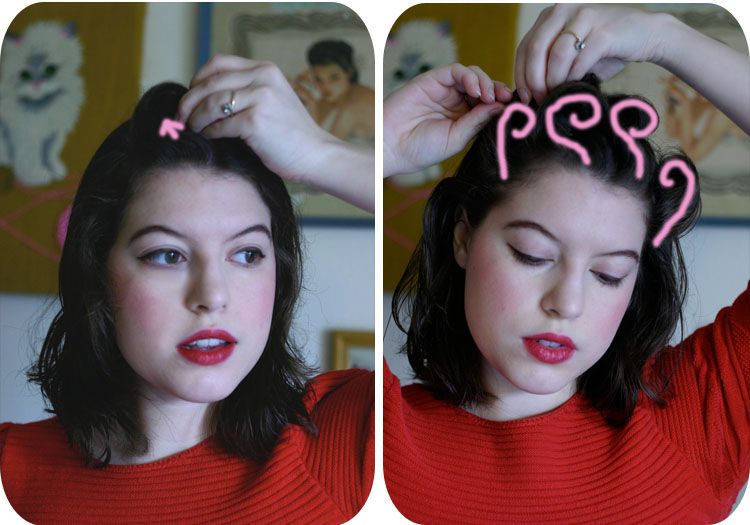
Continue to do three more upright pin curls, in the directions shown in pink.
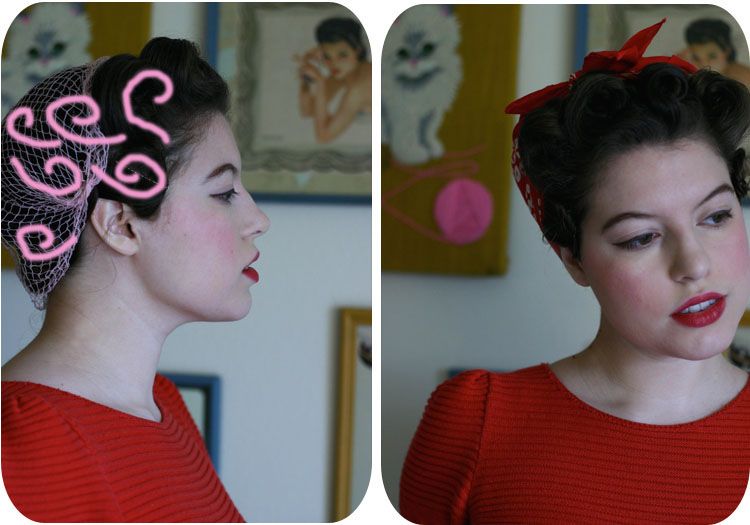
As for the rest, I do a back an forth, flat pincurl technique, and secure a hair net. The front actually looks like a style, so if you want to make it pretty, and show off the front curls, add a headscarf using this tutorial.
At this point I sleep, and let time do the work for me. If you are pressed on time, or wake up to some dampness, sit under a hood dryer until the set is completely dry. I always do a heat setting, and once dry, do a few minutes of cool to strengthen the curls and add a bit of shine ;)
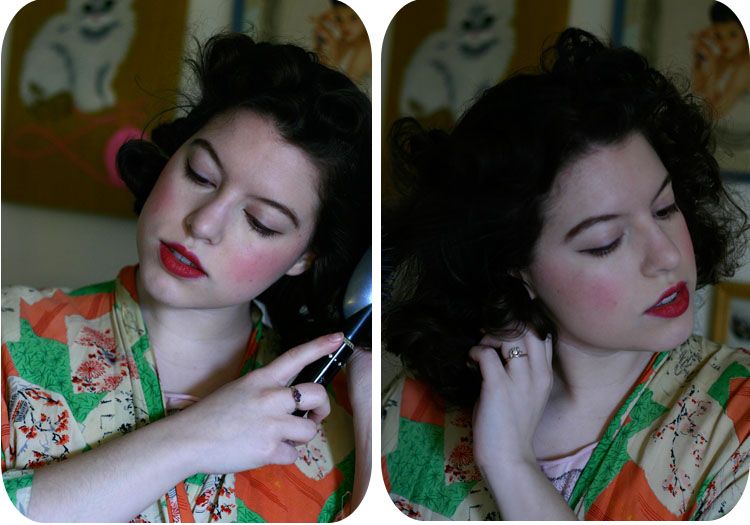
Once your set has dried, take the bobby pins out and use a large brush if you have a strong curl hold, or use your fingers if you have a weak hold. Fluff everything up, I take my brush and brush out instead of down. You will look like an 80s rock star. Don't panic.
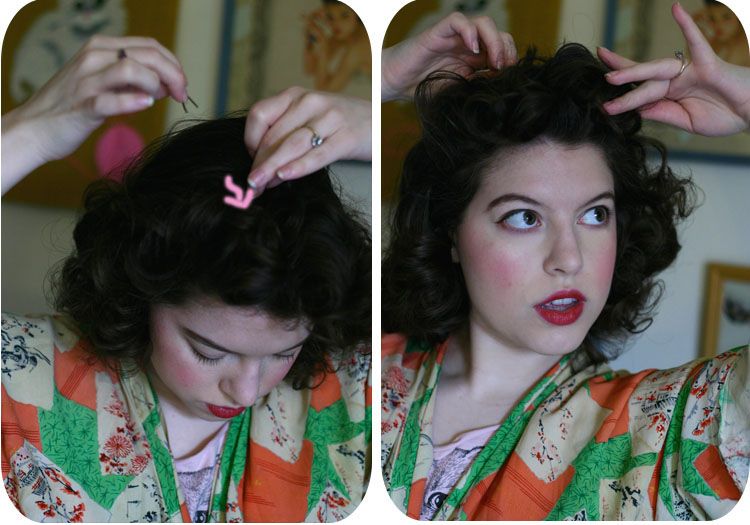
Brush the upright pincurls up, then add a little pomade and work that through with your fingers. Play with it a bit, brush more if needed, fluff it up, and once it looks like a nice, even set of curls, take a bobby pin, and pin from the back forward. Do this at various places on your crown, until it looks satisfactory. It should have lots of body, and the pins should be hidden from the front view. It takes me about three to four pins, but use as many as necessary.
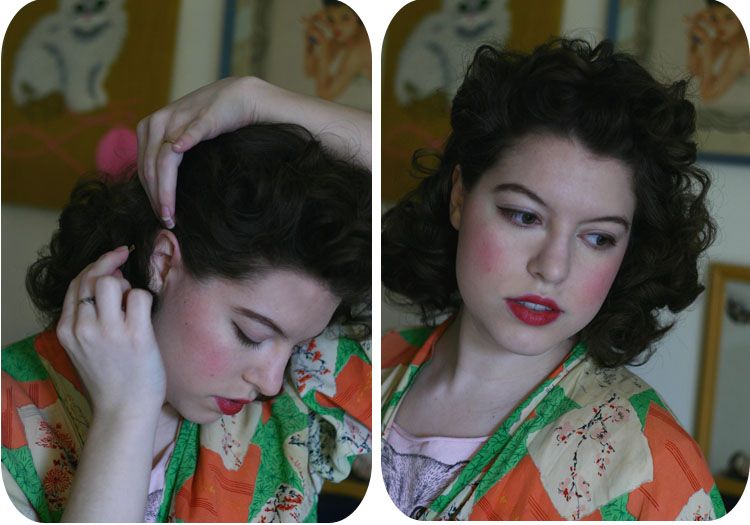
Now, take the side of your hair, and pull back, pinning right above the back of your ear. Criss cross the pins if needed. You can also nix the pins and use some pretty combs! The photo on the right shows the difference between one side being finished, and the other only being half done. The pinning back makes a world of difference.
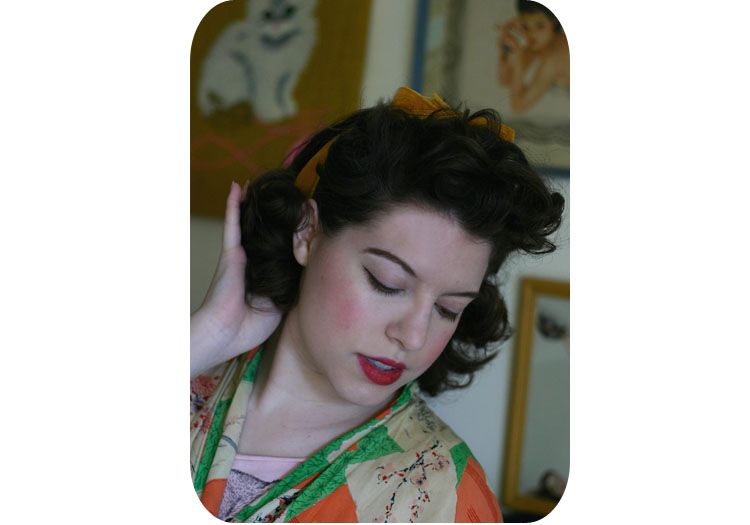
The finished style will look something like this. Add a ribbon, scarf, hat, or leave it be, you now have an authentic 1940s hairstyle :)

63 comments:
sort of off topic but that red shirt looks beautiful. i love the color and the way it looks on you.
Thanks for this! I will have to give it burl - but might need to grow my fringe (bangs) out first or it may look just a wee bit odd.
Just gorgeous Solanah! Thanks so much for posting this- your hair always looks amazing :) (and I was always curious how you did it :) ).
This is fabulously perfect....
thank you.... I am off to practise!
xx Lucy
I've done pincurls since I was little (ok technically my mom did them then). After reading this, I am inspired to do them now but there just isn't enough time for them to dry tonight :( Thanks for the step by step for this style though!
I remember doing this when I was wee-little. It didn't look half as good as yours...mine looked like some sort of exotic poodle that got caught up in a rainstorm.
Lovely, people with naturally curly hair are lucky! Think of the time they save!
Thank you for sharing.
guauuuu!!!!
This hairstyle is perfect for my best friend Carmen!
thanks!
Greetings from Spain
:) Sara
~ * ♥ * ~
Fabulous tutorial Solanah, I cannot wait to try this out myself. Thanks for posting it up.
^ __ ^
xox,
bonita of Depict This!
~ * ♥ * ~
Thankyou, this was really helpful and I can't wait to give it a try! I especially like how you added the little pink arrows/curls, they make things alot clearer. I'm so glad you're back to daily posting, not just giveaways.
This is a great post. Thank you. !
And the first style fits great to your face , I love it
wonderful tutorial .. Thank you for sharing. Your hair turned out lovely
Thanks for sharing! You always have the cutest hair. I think my biggest problem is that I panic when I get to the 80s looking bit, but now I know what to do. :)
So cute! I especially love the look with a ribbon. ;) I have been rag curling or using sponge rollers on my hair a lot lately; mostly because I've let my hair get too long for pin curls. Should think about getting it trimmed soon. ;)
♥ Casey
how beautiful!! Love how you did it. I agree about the ribbon look. nice job. Sometimes I miss doing these shorter hairstyles that I can no longer do since my hair has grown so long.
Ernest Hemingway is my favorite author. I wish I had seen the Palermo scarf giveaway yesterday. Shucks. I just bought a silk scarf with a matador on it because I love Hemingway so much. Nice hair tutorial by the way. Thanks!
very helpful tutorial - I'll give it a go once I have my hair cut to a more manageable length (I know I've been promising myself a haircut for MONTHS - it'll happen one day, I swear!)
xx Charlotte
Tuppence Ha'penny Vintage
Any suggestions for a good pomade? Excellent tutorial. I love the look with the headscarf.
thank you this looks very handy. My ahir is a night-mare to try and style, it's annoyingly slilcky so won't hold anything unless it is drenched in hairspray, which isn't a very good look. I also have a book on how to do vintage styles, I've yet to use it properly but I'm looking forward to it :)
Great tute! Makes me want to cut my hair off to try, but I have been growing it out from a pixi with Kardashian styles in mind!
Someone asked what kinds of pomades to use, I dipped into a lot when I was a stylist. I personally like Paul Mitchell's dry wax because it is really thick and pasty. Those runny, slime like ones are way to wet for this. A little dab of a sticky dry wax rubbed between your fingers and lightly distributed through the hair will give awesome hold. Sorry to write a novel, pomades can be so confusing!
Great tutorial! I love all vintage hairdo's!
I do have to say, this was a amazing 1940's hair how to!!! :D
Divine as always
Miss Amethyst
your hair looks amazing. this was a great tutorial, i am going to try this one maybe this weekend. Thanks for posting this!
Thnks for nice and ready-to-use tutorial. I'm great fan of your appearance!
Greetings form Poland!
You look like a 40s movie star! Stunning.
That is so lovely and you look beautiful!
Thanks so much for the how to. I love 40s hair so much, and this looks easy enough for even me to do even though I haven't had much luck with pin curls in the past ;)
This was so incredibly helpful! Thank you so much.
this is adorable! i want to give it a go, though it probably won't look nearly as polished as yours! you look stunning :)
PS- your blog is just fantastic.
Great post! Ever consider doing youtube tutorials??
By the way, do I spy a kitty blouse while brushing out the curls???
Thank you so much for this tutorial! I've never done standing pincurls, got to give it a try, I loved the result of yours =)
Awesome tutorial, I usually do rags curls to varying success so will give this a go! :)
Just now seeing this post! How wonderful and great pics! I tried this last weekend and am brand new at "trying" these styles. Now you have inspired me to do more ;-)
Brande
http://bit.ly/e18JvT
Cherry Rosesea, yesm it's my little kitty nightshirt :)
Ahhhhhhhhh!!!! Now I see. When I did pin curls a few years ago it turned out a bit fro-ish. LOL and on Easter Sunday no less. Thanks so much for doing this post. I NOW have to try this!
(woops was accidentaly signed in as some one else)
Thanks for this tutorial, I am now motivated to stop being lazy and trying pin curls in the evening. I also wanted to let you know that I added this link to my blog post about 1940's hair accessories. Check it out if you like http://vintagecatwalk.wordpress.com/2011/03/16/1940s-hair-hair-accessories/
Thank you for this! I own the Vintage Hairstyling book and LOVE it. I haven't found many vintage hairstyles for mid-length, but now I know what style I'll use tonight. :) Do you use a satin pillow/pillowcase at all for your hair? I hear it doesn't crush the hair while sleeping.
Oh YAY!! I cant wait to try this when I get home! I'm just hoping it will work well with my longer hair! i havent done pin curls in a while so i better start practicing. lol thanks again, your tutorials are such a big help
I know that this is not the acutal topic of this post, but I love your make up!
I clicked over here from a link on Penny Dreadful's blog and I'm so glad I did! Your hair looks absolutely incredible.
♥ Leia
After reading this tutorial, I google searched "upright pincurls" and you were the top result! I thought you might get a kick out of that ^_^
Great tutorial!! Thanks!!
http://inthehammockvintage.blogspot.com
Such a great tutorial, I love hair like this, but have never tried it
Lauryn, nope, just regular cotton
Any tips on how someone with the finest hair (the most I can usually achieve even with hot rollers or irons is a vaguely 70s flick) who lives in an extremely humid place can do 40s hair?! I also have kids so I don't have a lot of time. Getting very frustrated! :(
(I love your blog by the way) :)
Sarah, try out pin curls, they seem to have the best hold :)
Going to try this as soon as I'm more practiced at pin curls. Beautiful! Also, it's been killing me, what kind of robe is that you're wearing in the second batch of pictures? It's just lovely.
It's just a vintage kimono I bought years ago :)
i need help.i tried to do your curls and i'm sitting here with an afro(i know the fro is normal) but i dont know what you mean by brush the upright curls.i'll try to e-mail you to but i really need your help soon.p.s.i'm 12
Hello Carmen! First off, I think it's so cool you're 12 and trying out this style!
For the upright curls, the ones at the front, take the brush and brush very well in an upward motion, adding some pomade (even lotion works in a pinch) to smooth out the afro look. Hope that makes sense? let me know if you need any more help :)
xoxo
Solanah
Thank you sooo much for helping me solanah.i didn't do any curls in the front.oh well:).i though you should know you blog is a HUGE life-saver my 89 year old great-aunt is having a 1940s themed party and this is a perfect hair style.i was just going to wear it for the party but i love it to much from now on i'll wear it every day.THANKS SOLANAH!!!;)
Hello, thank you very much for these photos that show so well how to do the curls. I did it a few time but it seems that my hair does no agree to stay curled and always go back as it is. You are so good at reproducing the 40's style !!!!
I have just found this gem of a post! Thanks so much for showing how to make a 40s style hair-do, step-by-step and with photos. They came out lovely on you. I'm now very excited to try them on my own barnet!
Solanah!
Your linking back to this post from your latest hospital adventure has got me thinking about my last attempt with this hairstyle, which was - not good. So, I've got a curling question ("curly q"?) for you. What do you do with the very back of your hair when you do this style? Do you continue to curl in the same directions as pictured in the side-view until they meet in the middle? Do you just leave the back alone? Am I perhaps making my curls too small? Something else?
Help! and thanks!
- Miz L.
Hello :)
I usually let the pattern meet in the middle. Keep experimenting and you'll get the hang of it!
Best,
Solanah
Hey Solanah!
I was wondering where you got your hair net. it looks super durable. I got mine at dollar general and if a pin catches on it or anything like that, it makes a great big rip!
should i look at an actual hair store or someting?
thanks
Beth
Hello Beth!
I actually found them at Safeway of all places! A pack of two lasted over a year, thanks for the reminder I need to get more! Hope they still have them. Though if you can't find them there, I'm sure they carry them at Sally Beauty or similar stores.
xoxo
you look georgeous. even without the 40s hair...
You sure look beautiful like this! I have always love 40's hair styles. Never knew how, and this is a great tutorial. I will give it a try!
Blessings,
Susie
Can there be a video of this? Please?
Love your whole look. Thanks for the how-tos on pincurls!
Post a Comment